My Experience Installing and Riding the Dillenger 250W Electric Bike Kit
Introduction
Hi, I’m Scotty, I’m 42 years old and would say I am a bike enthusiast whose enthusiasm has come in bursts over 25 years of riding bikes. My biking is one of the reasons I moved to Canberra, Australia around 15 years ago. I have wanted to commute on my bike for a long time, but its 18 kilometres to work, just a bit much, so I started to look at e-bikes, several years ago.
It wasn’t until I’d found the Dillenger kits at such a low price that I could finally do it. Sure, you can possibly fit your bike out with a basic 250w kit for less but I wanted reputation and service, from a global company, and in that regard I couldn’t beat Dillenger’s basic 250w front hub kit.
How it started
I bought a bike last year, as I already mentioned I wanted to commute, and I had a great bike for that, but at the same time my son enrolled in a college that was 12.5km away, as opposed to his high school distance of 3km. My son likes to ride, but I wouldn’t call him an enthusiast, as with many 16 year olds of this generation, he is a much more computer gaming enthusiast. So he was keen to get fit, and get to college by himself. With public transport looking like 2+ hours each day (yes, it can take that long to go 12km here) I thought this would be the perfect thing for an e-bike, and my chance to test the waters.
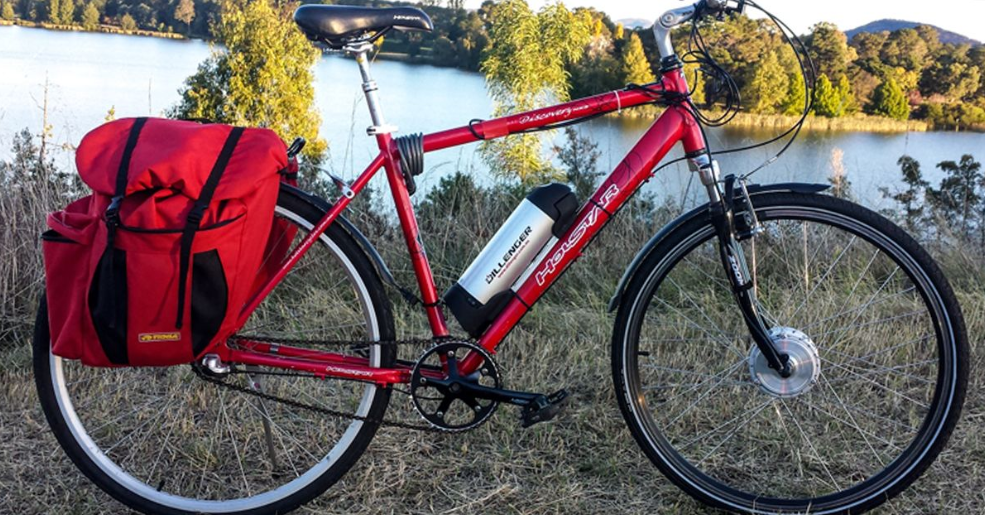
I found a hybrid, with a three speed Nexus hub, the bike is a Holstar (no longer in existence) Discovery, which is a low to mid range hybrid with suspension forks and post. It was $150 second hand on eBay, and seemed to be in very good nick, with a $500 price tag when it was new. I grabbed it, and not long after ordered the Dillenger 250w basic kit for 700c bikes. I had to replace the dodgy seat post with a better one, so the initial outlay was $200 on the bike.
Going electric
I found the Endless Sphere forums not long after I ordered, and was vindicated in my decision having found several great reviews and comments about 250 watt kits and others from Dillenger that had done thousands of kilometres. The kit arrived, and having been a part time bike mechanic in a shop in my twenties I know how to wrench so I had no qualms about fitting it myself.
The kit was so easy to fit, for most installations you can have pretty basic bike knowledge and do it yourself. Fitting the main ingredients only involves a few steps:
- Removing the front wheel and fitting the supplied one, and adjusting your brakes to suit
- Fitting the bottle cage mount battery and controller
- Removing your grips and fitting the control panel, throttle with grips, and brakes
- Fitting the PAS (Pedal Assist Sensor) and wiring everything up

All of it should be achievable for someone who has changed grips and a tyre on a bike but it also depends on your bike. On mine the PAS had no room to fit on the left crank as the crank is doesn’t have enough shaft between it and the bottom bracket shell. I modified the PAS by cutting off the inner “fins” to the size, which would fit on the crank and glued it. I used some Shoe Goo as it was all I had, but knew it wouldn’t last, so I’ve now used Selleys All Clear, which will hold it tight forever. This required crank removal which often needs a special tool and I have one but you may need to visit a shop if you encounter the same issue with space and can’t remove the crank.

The ride
I had no idea what to expect having only ridden a 1500w throttle only beast that does 50km/h without pedalling. At first I decided not to fit the PAS, I figured I could just pedal with the throttle on and all would be fine, but this was a big mistake. Just riding to the shops and testing it out in my street it seemed fine. Then I decided to ride it to work, using the throttle and pedalling. I basically held the throttle on full, and pedalled at a moderate to high effort. I arrived at work and found my battery indicating less than half. I’m pretty sure once again I found a good answer on Endless Sphere, I read about how the PAS will always give you better battery life than trying to control the throttle. On it went.
Speed
I regularly get 24km/h average on my commute both ways. I arrive at work moderately warm, but usually not sweaty enough to have a shower. I have a couple of little steep climbs on the route and cruise past all but the most serious cyclists on these climbs without getting out of the seat. I estimate that on the same distance I’d get 18km/h with roughly the same effort with a light bike and no motor.
But the bike wasn’t just for me, my son has ridden it to school at least as many times as I’ve ridden it to work. My estimate above comes from riding with my son on his first e-bike commute to college, we averaged 19.5km/h over the 12.5km route, I struggled to keep up on hills! He just loved it, and he averages half an hour each way which is awesome compared to the bus. He stores the battery in his locker, and locks the bike up on the school bike rack. The only issue so far is some bozo who put staples in the tyre but that seems to have stopped, and I’m an expert patcher.
Battery life
It all depends on what you put into the pedals, but on my round trip commute I arrive home with under half (2 leds looking at the LED display on the battery) when pedalling at a moderate effort. If I put in some extra effort I can get three leds when I get home. I’m yet to run the battery down completely, but I’ve put about 45km on and had it down to 1 led. I’d confidently set out for a 50km ride with my current riding style. At roughly a 20kg bike with the kit fitted, it’s pretty easy to pedal without assistance too.
Overall
After a couple of hundred km ridden, I crashed the bike, hard! I broke the battery carrier from the impact, and managed to fix it myself but I let Dillenger know and they sent me a new carrier in case my repair failed. I took the chance to rewire and put a tube over all the connectors as I wasn’t entirely happy with the first wiring job. The bike has done over 500km and hasn’t missed a beat, as far as the kit goes. The terrible forks are another story and will be replaced soon. Motor manufacturers recommend a solid fork for front hub motors, but this one would have been just as bad without the motor. I reckon if you’re thinking about converting a bike, or even obtaining a bike to convert, you can’t go wrong with this kit.
